Monday, November 16, 2020

Game Fun

Games can be described by the 3 components Mechanics, dynamics, and aesthetics (MDA) or otherwise stated as rules – system – “fun”. The three reading selections this week and the synopsis below all address the term “fun” in relation to game design.

There are eight types of Fun outlined by the MDA. These eight are both a source of reference and player experience that blend together in many ways, and essentially what makes a game fun and enjoyable.


To date, the MDA papers define the '8 kinds of fun' sensation, fantasy, narrative, challenge, fellowship, discovery, expression, and submission, remain a source of reference and possibly the most popular list of player interactions combining in various forms to attract each player to a particular game.


“Fun is a byproduct of good design. It is also not essential for a good gamified system,” by Andrzej Marchewski

There are a variety of definitions to describe the term “Fun”. Both Oxford and Merriam dictionaries define Fun as an enjoyment, delight. But within the context of a game it usually refers to a form of pleasurable entertainment.

 Nicole Lazzaro conducted a study in 2004 which resulted in the “4 Keys to Fun: the game mechanics that drive play”. These keys are based on the players emotions during gameplay which  involved in defining how fun a game can be for different players. The first key (Easy Fun) gives the player an opportunity to explore the game, It isn’t demanding in terms of challenge and it relaxes the player. The second key (Hard fun) comes with a challenge and it’s when the player gets put in difficult situations which results in achievement. The next key is (People fun) is a multiplayer experience resulting in competition and participation. The last key (Serious Fun) is when the player has the freedom to change the world around them and their character.


The Concept of Flow is characterized as a balance between skill-challenge and the individual's enjoyment. When in flow the player is focused on the activity they are participating in. This gives a sense of reward and promotes further engagement in the activity.

Flow theory provides a good framework for analyzing motivation in gaming activities, in particular enjoyment, engagement and positive affect.


Figure 3: Graph showing the flow zone, where the game is not too easy where the players abilities are very high (Boredom), but also not too hard that the player is unable to complete the challenge (anxiety).


Theory of fun in game design is book written by Raph Koster in which he talks about how fun in games can give room for a large space for learning within the players involved. “Fun is the feedback the brain gives us when we are absorbing patterns for learning purposes.” – Raph Koster. Here Koster talks about the human’s ability to memorize and recognize a large array of patterns which can then be implemented in games. When our brain learns from a situation in the game whether it’s solving a puzzle or completing a quest, our brain recognizes this and dopamine is released signifying our fun in games.


There is a common thread in which many overlook games on the basis of just fun and entertainment. However, different games can teach us different things. Games can also be sectioned into different types depending on what they teach. For instance, Koster mentions Type 1 Games which require thinking, analysis and strategy techniques e.g Chess or Civilization. Type 2 Games refer to “reflex based skills” in games like shooters that require “sharp reflexes” and in fighter games that require “combo memorization and the execution”. 


“The gap between those who want games to entertain and those who want games to be art, does not exist.”

Koster concludes that by understanding how fun works in games, it will also lead to understanding of how fun is achieved in the creation of a game. This, in turn allows us to reflect and learn from our experience of the game.

Games help people to become more imaginative, engaging with their creative side of the brain and creating new ideas/designs that can be implemented in games. Being more creative when developing your game will help you see what challenges the player may face and what ones will help further improve the progression and also add to the player's determination to complete the story.


References:

Velev, A., 2016. Gamification Design: What’S Fun Got To Do With It?. [online] Megamification. Available at:<http://www.megamification.com/727-2//> [Accessed 16 November 2020].


Kaye, L. and Bryce, J., 2012. Putting The “Fun Factor” Into Gaming: The Influence Of Social Contexts On Experiences Of Playing Video Games. Available at: <https://core.ac.uk/download/pdf/9632557.pdf/> [Accessed 16 November 2020].


The Game Overanalyser., 2020. A Theory of Fun for Game Design | Raph Koster and The Art of Designing Fun Games. Available at: <https://www.youtube.com/watch?v=6sZJYA06z7Y&feature=emb_logo&ab_channel=TheGameOveranalyser/> [Accessed 16 November 2020].

Sunday, November 15, 2020

Project Prototype


For my game project this week, I began by putting theory to practice and started building my first prototype of the game in Unity.


I have imported a few assets which were used in previous Unity tutorials, such as the mountain dome from the first tutorial and the animal objects from the second tutorial. I also added a simple white plain so it didn’t look like the animals were just floating in the air.


Screenshot of work in progress project prototype

 As you can see the stage for the environment is not complete. I decided to leave the game’s environment as it is to help me visualize as I’m looking to focus on getting the game itself working and running smoothly.


This week, I decided to focus on getting three things for the game up and running:


Player Movement – This was not difficult to do as the first unit of the tutorials covered this. I was able to get the character to move and rotate based on the player’s horizontal and vertical output. However, I noticed an issue with the player’s movement in play mode once I have gotten the camera focus on the character.


Switching Characters – I was able to find a tutorial that showed how to create an option for the player to switch between different characters (game objects). I was introduced to code that we haven't touched on in previous videos. 

In this tutorial, the player needs to click on a button on the UI (User Interface) in order to switch characters. This is slightly different than what I had planned where I decided for the player to use the Ctrl key to switch between animals. However, it got me thinking that I could present the player with both options for switching characters to give the player a small option of choosing what they’re comfortable with in case there are too many game keys for the player to remember.


Camera Focus – I also did a recap on the first unit of tutorials in order to make the camera follow the player. However, I set mine different for my game as I wanted the camera to change position according to the animal’s size to make it feel like the perspective changes a little bit. So I wrote the code differently than in the tutorial.


Tutorial


My Code


To give some context, I have made an empty player object and nested two animal objects inside the player object. (This is to be able for the characters to switch.) I can’t say I have noticed a difference in perspective. I need to mess around with the positioning more. A problem that occurred when trying to do it this way is that player movement is a lot more rigid. The player moves a bit slower and the camera is a bit shaky.


Also need to figure how to make my IDE accept decimals for the XYZ camera position.


My focus for next week:

Main: Refine GDD. Include all assets, tutorials, sketches and any area of the game that I wasn’t sure about I need to work it out before I continue. I feel like I need to scale down a bit of my game idea as well.

Afterwards, I will continue adding on the game interactions.

Thursday, November 12, 2020

Unity Tutorial 06

Screenshot of my unity tutorial

This week’s tutorials were particularly fun to complete. I learned how to add music, sound effects and particle effects in order to create a polished and complete game.

The process was more simple than expected. Essentially, for the particle effects I had to attach it to the game object. This would then appear in the hierarchy as a child object of the object it was attached to.  However, in order to control when and how the particle will played it needs to write code in the script for it, usually it is included in if-statements. First a public variable has to be made for the effect as it is not directly linked to the object like other components. Then it can be dragged into the box.

A little menu box appears where you get the chance to play, stop or restart the animation of the particle effect so you can see if you need to make any adjustments. There’s an overwhelming amount of options in the inspector menu of the particle effects where you can make different interesting changes such as the velocity or color of the effect.

To add music to a scene you attach an audio source component on the main camera. Then you attach the sound clip to that component. If the music runs out, there’s an option to loop it. For specific sound effects, they need to trigger in the code. You create a public variable using the AudioClip class where you add the soundclips in the player script component in Unity. Then similar to the particle effects you write a code in the if-statement to control when you want the sound effect to play.

Challenge 3 was a bit tricky for me. This is because when I looked at the line of code and compared it with what I had written during the tutorial I had to remember what some bits of the code represented. I should start to get into the habit of writing comments next to the code for reminders. That’s it for this week. I’m curious to see how much I’ll be able to implement when starting out to create my game.  See you then!

Monday, November 9, 2020

Games Decisions

 “In order for the player to be optimally engaged, challenges should be presented at a level equivalent or slightly higher than their current skill. Not too easy, not too hard”(Gigity McD)


The word 'flow state' was coined by Csikszentmihalyi (1975) also known as being “in the zone”. This is when the player is fully engaged in the game experience. Csikszentmihalyi put a lot of work into observing and analyzing various groups of people. This theory is focused on the idea of how people should balance their skills and the demands of particular tasks. An example of Flow would be a challenge in a game that interests the player such as a puzzle or a boss battle meant to keep the player interested and not get bored. Csikszentmihalyi also states that flow is related to an ideal psychological condition when a person engages in a challenge-skill activity, often resulting in concentration and a focused emphasis on a task.


A practical technique for improving Flow is to look at what players like and find interesting, it is an invaluable resource as this will give you a better understanding of how to structure your game in a way it flows naturally without affecting the players’ experience and enjoyment. If the player has a high skill set and the game is not a challenge, the player will become disinterested and lose interest in the game. The game must allow the player to grow and learn with each challenge or obstacle so as to stay motivated to continue.

If the player has little to no skill set and the game is too challenging, then the player will become frustrated with anxiety and lose interest in the game as well. A flow chart helps to prevent the game from being too boring or too difficult(create anxiety) which makes the game more successful in terms of achieving Flow. 


The X axis is the player's skill and the Y axis is the challenge. When the player starts off, the challenges are easy in order to introduce the player to the game system. Overtime, this will  increase the player's skill. After the player has progressed through the game the challenges get more difficult. This is known as the flow channel and is the ideal place to maintain the player in the flow state. If the challenges are too easy the player will become bored of the game. If the challenges are extremely difficult for the player, the player will get overwhelmed, frustrated or fed up with the game. This is the point where the player reaches the anxiety state of the flow map.


Studies have found Cook (2008) that there are both positive and negative consequences with game flow. The positive representing cognitive flow   “composed of challenge-skill balance, clear goals, and unambiguous feedback,” and a negative element viewed as the emotional flow “composed of action- awareness merging, concentration on the task at hand, sense of control, loss of consciousness, and time transformation.” In the development of computer games, designers must be aware of these two characteristics when developing games.


References

Numinous.productions. Dan Cook 2008. Building A Princess Saving App. Available at: <https://numinous.productions/ttft/assets/Cook2008.pdf> [Accessed 9 November 2020].


McD, Gigity (14th June 2018). What is FLOW THEORY in game design? - The Basics - (Part 1). Game Design with Michael, https://www.youtube.com/watch?v=3H8pQyyXxHg


Sanjamsai S, Phukao P. 2018 Flow experience in computer game playing among Thai university students. Available at: <shorturl.at/rtvGM> [Accessed 9 November 2020].


Sunday, November 8, 2020

Game Design Document

 The GDD was fun to work on. It helped to reveal areas in the game design that where lacking or  missing  which you wouldn't think of initially because the document is very in-depth. There's a lot to think about. I know I'm done with it yet as it is a living document but I feel I might be going in the right direction with it. 

Initially, I wanted to stick with Word for the GDD as it was something I was familiar with however, I'm glad I decided to take a plunge into something new. Dundoc turned out to be very simple to use and VERY easy to maintain and LESS time consuming compared to Word. 

Dundoc has some templates ready for you to get started with. However, I decided to make my own following example from Mark Baldwin's GDD template layout. Here's a link to my GDD: https://www.dundoc.com/project/6917/neta3be22v

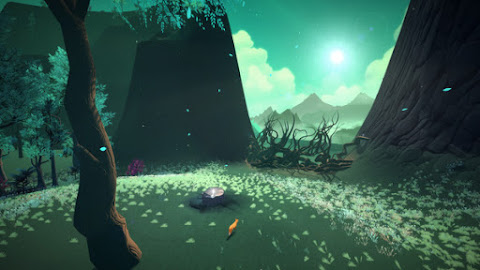
One of the areas I need figure out about the game is to look for assets in terms of surroundings and some other animals. Here's some images from a game by David Wehle - The First Tree. I don't too much about the game, but I found the images inspiring and could help to think about the look and feel of the game. 


Friday, November 6, 2020

Unity Tutorial 05


This week’s tutorial has been interesting. We learned some features that made our game more game-like. I realized how more comfortable I was when working through the tutorials, especially with the scripts, I was able to recall some code we used in previous tutorials.

The lessons focused on creating a fast-paced runner game where the player needs to press the spacebar to jump in order to avoid obstacles which fly towards the player.

I got a bit insight on a different way to make game objects do different things. So far,  only the Translate () method was used to bring objects into our scene. However, to make the game seem a little more realistic I got a little more insight about Unity’s own physics engine which calculates the objects mass, external forces acting on that object and gravity which simulates real-life physics in the game.

In this tutorial, I had to use the AddForce method instead, which uses Unity’s physics engine to make the character’ jump force realistic.

Screenshot of my Unity tutorial.

The Sprite Render component is a new feature I was introduced which essentially rendrs images into the game and can be used to create the 2D background just the like the forest background used for this game. We were able to make it appear like the player was moving by applying a written move script to the background (kind of like looking out the window of fast driving car).

Another useful skill was to call other methods to target different game components. Before, we only used gameObject and Transform.

To control the character’s movement, gravity and other characteristics we used new method to be able to access other components which aren’t found on every game object such as the Rigidbody. To do that we used GetComponent method.

Finally, the more part was learning to do our first animations. Animation Controller with an unusual interface that looks similar to  a mind-map diagram. When viewing the game on play-mode, the diagrams will indicate what animation state the character is in. The parameters section allows use to control the length and speed of an animation. We also managed animation transitions in our scripts using if-statements to control when the character enters different animations states depending of what the player does e.g if player accidently hits the obstacle the character transitions from a running state to an animation where he is knocked unconscious.

This was a fun unit overall. Hopefully I’ll be able to remembers most of what I learned when it comes to making my own game.

Monday, November 2, 2020

Games GDD


What is the GDD for?


A Game Design Document (GDD) is a blueprint for the design and development of a game.

The GDD is a way of being creative and documenting the approach to the development of the game. Gonzale (1999) states that “ the important thing is to have something that describes your game project (or any other project for that matter) before jumping into production.( Gamasutra ) It should help to plan out your game. Though it is recommended that the GDD should be short it needs to be detailed enough so as game developers and artists can coordinate the development of the game independently whilst still keeping to the design. The GDD is a blueprint for how the game is going to be designed and built, similar to a mind map. In conclusion, the game design document is vital to making a game and it is important to have in order to describe your game project.


Image, game design exercise preview from lynda.com


How do we make one?


There are a variety of tools that could be used to create a GDD. These include word processing tools, visual tools like Powerpoint, or new web-based tools such as DunDoc. Each of these tools has their advantages and are a personal choice. Many of the examples shared via the internet are in Microsoft Word format. Romero Games(creators of Doom) favour a more visual tool such as PowerPoint. Whichever tool is used they should support the development of the game in an open and transparent manner.


What should be in it?


The GDD should be simple enough to read through details about your game design and concept. Schubert (2007), who was at the time lead designer for Bioware Austin, gave a GDC talk in about how to create design documentation, some of the most relevant elements include:

  1. Know your target.- Have a clear vision and understanding of what you want to make. Make sure your game is suitable and fits your target audience.

  2. Keep it short.  Keep it to the point and clear, the shorter they are, the easier it is to read, write, and maintain.

  3. Prioritize the design.  - Divide your game in order of importance e.g have a functional game. Concentrate on core mechanics and visuals, and then expand. 

  4. Illustrate. - Draw sketches of your plans that make it easier to structure and implement. Present what your game would look like as it’s important to have a clear idea of the visuals before you begin creating.

  5. Use user stories.- Describing the game through the player’s vision (Similar to what we did in the game vision statement).

Take into account the games users, their ideas may help develop future storylines or ideas.

  1. Invest in a good format. Take the time to structure your work so that it is easy to navigate.

  2. Use clear terminology. Don’t over-complicate the document. Make sure language is concise and accessible.

  3. Kill redundancy.  -Recycle your code - use variables, not hard code). Always reference the new section on your page to have a clean document. Avoid copy and pasting sections.

  4. Capture your reasoning - why did you make the choices you made? What led to that thought process?

References

Nachen, Lennart. 2014 Communication and Game Design Documents accessed 02/11/2020 http://acagamic.com/game-design-course/communication-and-game-design-documents/


Ferns, Shaun (2020) Readings Week 06 accessed 02/11/2020 https://cdmonline.ie/multidev1/reading-week-06/


 Gonzalez Leandro. 2016 How to Write a Game Design Document accessed 02/11/2020 

https://www.gamasutra.com/blogs/LeandroGonzalez/20160726/277928/How_to_Write_a_Game_Design_Document.php


Doing

  We are nearing the end of this semester and the book we’ve been working throughout the semester is in its final editing stages. This week,...